EASY HAIR BUN ALTERNATIVES TUTORIALS (Cara Mudah Megikat Rambut)
Apa Anda bingung cara mengatasi rambut yang berantakan??? Saya punya
cara mudah loh :) yang biasa saya lakukan sebagai anak muda :) Mengatasi
rambut berantakan namun tetap gaya :) mau tau caranya??? Yukk !! Simak
posting saya kali ini :
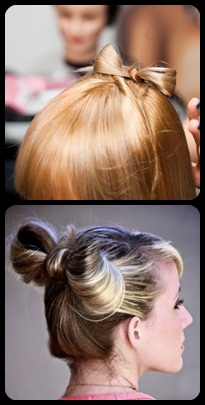
MAU KAH BISA SEPERTI INI ???
MAU TAHU CARANYA????? YUKK SIMAK :
1. KONDE
2. ONE SIDED
3. AVERAGE PONY
4. MOM'S KONDE
5. BRAIDED CROWN
6. EASY BRAIDED
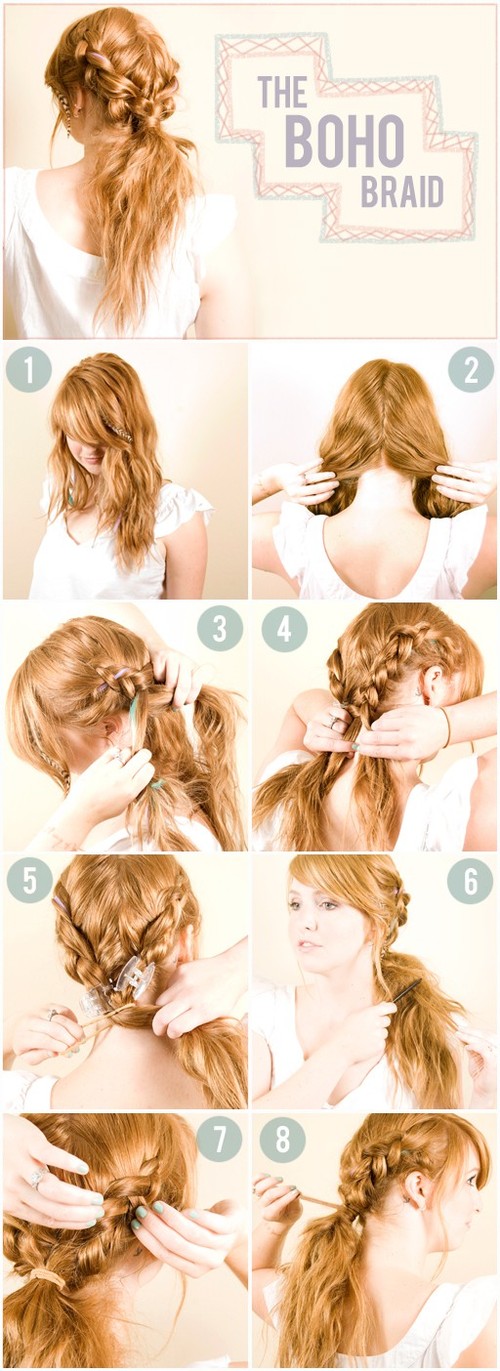
7. BOHO BRAID
8. BRAID KONDE
9. CHESTNUT BUN
10. FAN BUN
11. THREE TWISTED BUN
11. TWISTED SISTER
12. EASY TWISTED BUN
Nah !!! Bagaimana ??? Ternyata mudah bukan?? Cara mengatasi rambut yang berantakan :) Yukk coba sama-sama :)

If you need a nail art technique
that will create designs that are as dazzling as the sun and as unique
as snowflakes, “Water Marbling” is the technique for you. With this
technique, no two nails will turn out the same. Each will remain an
unreproducible work of art. Best of all, this technique is extremely
easy, making it a perfect option for beginners.
Marbled patterns
make an excellent background against which to place delicate designs
using gemstones or other elements, but they also look great on their
own! With just a little practice, you'll be able to give each of your
clients a unique design that will leave them speechless.
What You’ll Need:
a manicure bowl, water, nail polish, top coat, acetone, and a marbling
tool (you may use a needle instead if none is available).
Technique: Water Marbling
Skill Level: Beginner
Step 1
– Fill a manicure bowl with water until the water level is about five
centimetres deep or more. (Note: it is okay to use a regular bowl, but
you must make sure that it is large enough to fit your customer's entire
hand.)
Step 2
– Now, proceed by placing a few of drops of white nail polish at the
centre of the pool. For this first layer of polish, it is important to
use several drops, otherwise the base coat might dry out too quickly.
Just place one drop at a time and watch the polish slowly stretch
outwards towards the edge of the bowl as you see above. If you can, try
to use thin nail polish whenever possible. If you use nail polish which
has a high viscosity, this technique will not be as successful.
Step 3 – Next, place a single drop of red polish at the very centre of your newly created circle of white polish.
Step 4 –
Once this drop of red polish begins to stretch out towards the edges
place another small drop of white polish at its centre. Then place
another drop of red within this circle of white. Repeat this process
several times until you have a series of concentric circles as pictured
above—red within white, white within red.
Of course, you need by
no means feel bound to use this same colour scheme. You can use any
colours you want! Really! Let your imagination be your guide. You can
use holiday themed colours, sports team colours, anything that you can
think of. The more varied the colours, the more psychedelic the effect.
Step 5
– Okay, now its time to break out your marbling tool. (Remember, you
can use a needle or pretty much anything else with a sharp edge if a
marbling tool is not available.) Gently move the tool through the
bullseye pattern to create lines and curves in any pattern that you'd
like.
Step 6
– After each line that you make, remove the marbling tool and give it a
quick cleaning. This will ensure that your lines are as clearly drawn
as possible.
Step 7
– Create any pattern that is pleasing to both you and your customer,
just make sure to work quickly. If you don't, the nail polish could dry
out as it floats atop the water. Try to do the entire process in about
sixty seconds in order to prevent the polish from drying prematurely.
Step 8
– Now that the pattern is complete, carefully insert your client's
finger into the water at the edge of the bowl, being careful to make
sure that you don't disturb the polish pattern. Then bring the
fingernail under the polish pattern and slowly lift it up so that the
polish adheres to the surface of the nail.
You can now repeat
this process with one or two more of your clients nails before the
remaining polish will run out or begin to dry. If some polish remains in
the bowl, simply lift it out using the marbling tool. At this point,
you need to repeat steps two through eight with the remaining nails
before moving on.
Step 9 – Use a cotton swab damp with acetone to carefully clean the excess polish off of the areas surrounding the nails.
Step 10
– Finally, simply apply a top coat and you're done! If your client
desires it, you can now proceed to add other design elements— rhinestones, nail art stickers, anything really!